RNN 실습, 뉴스 기사 분류
RNN을 활용한 로터스 뉴스 분류
- 영국의 뉴스 통신사 로이터의 ’기사 내용’이 들어가면 어떤 ’주제’인지 분류하는 RNN 모델 실습
keras에서 제공하는 데이터셋 불러오기
- 실제 뉴스 기사의 내용이 이미 단어단위로 토큰화, 라벨 인코딩 되어 저장이 된 상태이다.
- 단어가 많은 경우 원핫인코딩 상태로 저장을 한다면, 저장공간 측면에서 매우 비효율적임
- 또한, 텍스트 처리 분야에서는 문제 데이터에 라벨 인코딩을 활용하면 단어의 빈도수까지 고려해줄 수 있음
- 1: 뉴스의 시작을 알리는 인덱스 번호
- 2 : oov(Out of Vocabulary)로 사용
- 3 ~ : 뉴스 전체 내용에서 빈도수 기준으로 랭크를 나타낸다
import numpy as np
import pandas as pd
import matplotlib.pyplot as plt
from tensorflow.keras.datasets import reuters

data = reuters.load_data()
(X_train, y_train), (X_test, y_test) = data

X_train.shape, y_train.shape, X_test.shape, y_test.shape
((8982,), (8982,), (2246,), (2246,))
0번째 훈련 데이터 에는 87개의 단어가 포함되어 있다.
len(X_train[0])
87
로이터 뉴스 기사의 단어들이 어떤 숫자로 인코딩 되어 있는지 확인
- reuters.get_word_index()로 확인이 가능
- key, value 쌍의 딕셔너리 형태
news_words = reuters.get_word_index()
news_words
{'mdbl': 10996,
 'fawc': 16260,
 'degussa': 12089,
 'woods': 8803,
 'hanging': 13796,
 ...}
- value값 기준으로 news_words 정렬하기
sorted(news_words.items(), key=lambda x : x[1])
[('the', 1),
 ('of', 2),
 ('to', 3),
 ('in', 4),
 ('said', 5),
 ...]
- 기사가 어떤 단어로 구성되어 있는지 단어들을 이어붙여 확인해보기
- key값과 value 값의 위치를 교체
word_of_news = {}

for k, v in news_words.items():
    word_of_news[v] = k
- 단어 이어 붙이기
print(' '.join([word_of_news[w] for w in X_train[0]]))
the wattie nondiscriminatory mln loss for plc said at only ended said commonwealth could 1 traders now april 0 a after said from 1985 and from foreign 000 april 0 prices its account year a but in this mln home an states earlier and rise and revs vs 000 its 16 vs 000 a but 3 psbr oils several and shareholders and dividend vs 000 its all 4 vs 000 1 mln agreed largely april 0 are 2 states will billion total and against 000 pct dlrs
뉴스 주제의 개수를 알아보기
- 뉴스 카테고리 갯수 : 46가지
np.unique(y_train)
array([ 0,  1,  2,  3,  4,  5,  6,  7,  8,  9, 10, 11, 12, 13, 14, 15, 16,
       17, 18, 19, 20, 21, 22, 23, 24, 25, 26, 27, 28, 29, 30, 31, 32, 33,
       34, 35, 36, 37, 38, 39, 40, 41, 42, 43, 44, 45])
데이터 가공
- timestpes를 설정해야 하는데 각 문제 데이터(X_train)가 포함하는 단어의 갯수는 모두 다르다.
- 그러므로, 문제 데이터의 단어 개수를 같게(입력 시퀀스 맞춰주기) 맞춰줘야 학습이 가능하다.
- 즉, 긴 기사는 잘라내고, 짧은 기사는 붙여 넣는 작업이 필요하다.
시퀀스 길이 맞추기
몇번 순환 시킬지(timesteps) 고정 시켜주기 위함 - 각 문제 데이터의 길이들을 불러와서 기술 통계값 확인해보기
# 각 문제 데이터의 길이 저장
train_len = [len(x) for x in X_train]

# 기술 통계값 확인
print(f'최댓값 : {max(train_len)}')
print(f'최솟값 : {min(train_len)}')
print(f'평균값 : {np.mean(train_len)}')
print(f'중앙값 : {np.median(train_len)}')
최댓값 : 2376
최솟값 : 13
평균값 : 145.5398574927633
중앙값 : 95.0
- 히스토그램으로 데이터 밀도 구성 확인
- x축은 뉴스 길이를 각 구간별로 표시, y축은 누적개수
plt.hist(train_len, bins=20)
plt.xlabel('news_len')
plt.ylabel('count')plt.show()

- 라인 차트로 기사 별 길이 시각화
plt.figure(figsize=(15, 5))
plt.plot(train_len)
plt.xlabel('news_index')
plt.ylabel('news_len')
plt.show()

시퀀스 길이 맞추는 작업 수행
- 기술통계값을 확인해본 결과 시퀀스의 길이를 120으로 맞추는게 적절하다고 생각함
- 긴 기사는 잘라내고, 짧은 기사는 패딩 작업을 해주기
- sequence.pad_sequences() : maxlen에 지정된 수만큼 길이를 앞에서부터 자르거나 패딩하여 맞춘다. 옵션을 주면 뒤에서 부터 가능
from tensorflow.keras.preprocessing import sequence

X_train_seq = sequence.pad_sequences(X_train, maxlen=120)
X_test_seq = sequence.pad_sequences(X_test, maxlen=120)
- 각 단어 데이터는 라벨 인코딩 상태이므로 feature는 1이된다.
- RNN 학습을 위해 input_shape을 맞춰주기 : (samples, timesteps, feature)
X_train_seq = X_train_seq.reshape(8982, 120, 1)
X_test_seq = X_test_seq.reshape(2246, 120, 1)

X_train_seq.shape, X_test_seq.shape
((8982, 120, 1), (2246, 120, 1))
SimpleRNN 모델링
- 현재 한개의 feature는 단어의 빈도수를 의미하므로, 빈도수만을 이용해서 예측하는 RNN 모델을 설계하게 되는것이다
- 다수 입력(input 120) 단일 출력(output 1) 형태
from tensorflow.keras import Sequential
from tensorflow.keras.layers import InputLayer, Dense, SimpleRNN
from tensorflow.keras.optimizers import Adam

model = Sequential()
model.add(InputLayer(input_shape=(120, 1)))
model.add(SimpleRNN(128))model.add(Dense(46, activation='softmax'))

model.compile(loss='sparse_categorical_crossentropy',
              optimizer=Adam(learning_rate=0.001),
              metrics=['acc'])
history = model.fit(X_train_seq, y_train, validation_split=0.2, batch_size=128, epochs=20)
plt.figure(figsize=(15, 5))
plt.plot(history.history['acc'], label='train_acc')
plt.plot(history.history['val_acc'], label='val_acc')
plt.legend()
plt.show()

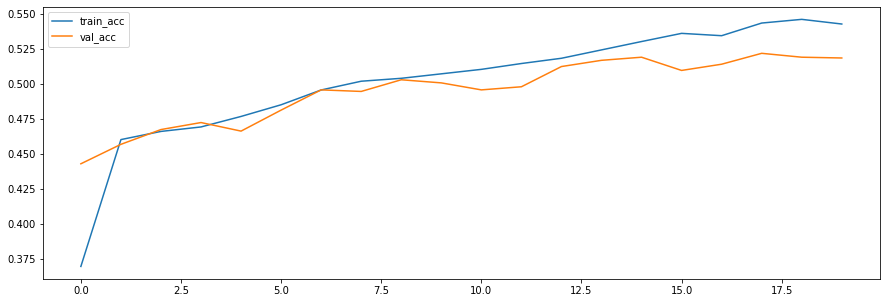
데이터가 빈도수를 나타내는 feature만 존재하긴 하지만, SimpleRNN으로는 높은 성능을 얻기 힘들다는 것을 확인
LSTM 모델 학습
- 다수 입력(input 120) 단일 출력(output 1)
- LSTM을 여러 층으로 쌓기 위해서는 이전 LSTM층이 다수입력 다수출력 상태가 되어야한다.
- 그래야 다음 LSTM층의 input 형태가 이전 LSTM층과 같은 형태가 되기 때문이다
- LSTM, RNN층에서 순환할때마다 출력값을 만들어주는 (다수입력 다수출력 형태) return_sequences=True 옵션을 사용해야 한다.
from tensorflow.keras.layers import LSTM, GRU

model2 = Sequential()
model2.add(InputLayer(input_shape=(120, 1)))
model2.add(LSTM(128, return_sequences=True))
model2.add(LSTM(128))model2.add(Dense(46, activation='softmax'))

model2.compile(loss='sparse_categorical_crossentropy',
               optimizer=Adam(learning_rate=0.001),
               metrics=['acc'])
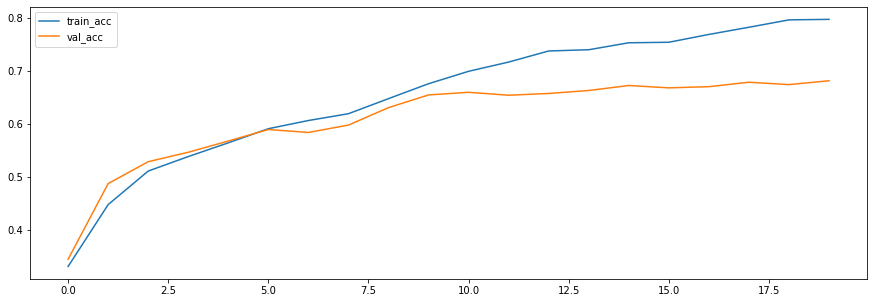
history2 = model2.fit(X_train_seq, y_train, validation_split=0.2, batch_size=128, epochs=20)
plt.figure(figsize=(15, 5))
plt.plot(history2.history['acc'], label='train_acc')
plt.plot(history2.history['val_acc'], label='val_acc')
plt.legend()
plt.show()

워드 임베딩(Word Embedding)
- 언어 모델의 성능을 높이는 방법은 모델의 구조를 변경하는 방법과 단어의 표현방법을 고도화 하는방법이 있다,
- 단어의 표현을 밀집되게 실수형태로 표현하게 하는 방법론이 워드 임베딩이다.
- 학습을 통해서 각 단어들의 수치값을 정밀하게 만드는 방법이다.
데이터 불러올 때 등장 빈도가 낮은 단어 제거하기
- num_words=1500 : reuters의 수치데이터 의미는 단어 빈도수 랭크이다. 해당 옵션을 주면 각 기사내용에 1500위까지의 단어만 가져오게 된다.
- 1500위 외의 단어들은 oov 즉, 2값으로 표현된다.
from tensorflow.keras.layers import Embedding

(X_train, y_train), (X_test, y_test) = reuters.load_data(num_words=1500)

# 시퀀스 길이 맞추기
X_train_seq = sequence.pad_sequences(X_train, maxlen=120)
X_test_seq = sequence.pad_sequences(X_test, maxlen=120)
Embedding 추가 GRU 모델 설계
- Embedding(사용하는 단어사전의 수, 한 단어를 표현할 특징의 수)을 가장 앞 층에 추가하기
- 사용하는 단어 사전의 수는 학습에 사용되는 단어의 갯수이다
- 한 단어를 표현할 특징의 수는 적절한 수로 설정해서 모델이 알아서 특징을 검출하게 해준다
embedding_model = Sequential()

embedding_model.add(Embedding(1500, 50))
embedding_model.add(GRU(128, return_sequences=True))
embedding_model.add(GRU(128))
embedding_model.add(Dense(46, activation='softmax'))
embedding_model.compile(loss='sparse_categorical_crossentropy',
                        optimizer=Adam(learning_rate=0.001),
                        metrics=['acc'])
history3 = embedding_model.fit(X_train_seq, y_train, epochs=20, validation_split=0.2, batch_size=128)
plt.figure(figsize=(15, 5))
plt.plot(history3.history['acc'], label='train_acc')
plt.plot(history3.history['val_acc'], label='val_acc')
plt.legend()
plt.show()


댓글남기기